When selecting a high-availability (HA) solution, you should consider several criteria. These range from the total cost of the solution, to the ease with which you can configure and manage the cluster, to the specific restrictions placed on hardware and software. This post touches briefly on 12 of the most important checklist items.
1. Support for standard OS and application versions
Solutions that require enterprise or advanced versions of the OS, database, or application software can greatly reduce the cost benefits of moving to a commodity server environment. By deploying the proper HA middleware, you can make standard versions of applications and OSs highly available and meet the uptime requirements of your business environment.
2. Support for a variety of data storage configurations
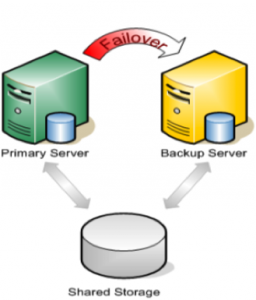
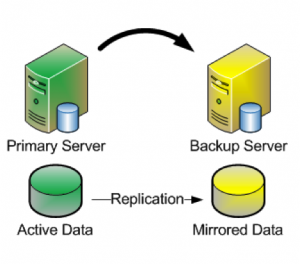
When you deploy an HA cluster, the data that the protected applications require must be available to all systems that might need to bring the applications into service. You can share this data via data replication, by using shared SCSI or Fibre Channel storage, or by using a NAS device. Whichever method you decide to deploy, the HA product that you use must be able to support all data configurations so that you can change as your business needs dictate.
3. Ability to use heterogeneous solution components
Some HA clustering solutions require that every system within the cluster has identical configurations. This requirement is common among hardware-specific solutions in which clustering technology is meant to differentiate servers or storage and among OS vendors that want to limit the configurations they are required to support. This restriction limits your ability to deploy scaled-down servers as temporary backup nodes and to reuse existing hardware in your cluster deployment. Deploying identically configured servers might be the correct choice for your needs, but the decision shouldn’t be dictated by your HA solution provider.
4. Support for more than two nodes within a cluster
The number of nodes that can be supported in a cluster is an important measure of scalability. Entry-level HA solutions typically limit you to one two-node cluster, usually in active/passive mode. Although this configuration provides increased availability (via the addition of a standby server), it can still leave you exposed to application downtime. In a two-node cluster configuration, if one server is down for any reason, then the remaining server becomes a single point of failure. By clustering three or more nodes, you not only gain the ability to provide higher levels of protection, but you can also build highly scalable configurations.
5. Support for active/active and active/standby configurations
In an active/standby configuration, one server is idle, waiting to take over the workload of its cluster member. This setup has the obvious disadvantage of underutilizing your compute resource investment. To get the most benefit from your IT expenditure, ensure that cluster nodes can run in an active/active configuration.
6. Detection of problems at node and individual service levels
All HA software products can detect problems with cluster server functionality. This task is done by sending heartbeat signals between servers within the cluster and initiating a recovery if a cluster member stops delivering the signals. But advanced HA solutions can also detect another class of problems, one that occurs when individual processes or services encounter problems that render them unavailable but that do not cause servers to stop sending or responding to heartbeat signals. Given that the primary function of HA software is to ensure that applications are available to end users, detecting and recovering from these service level interruptions is a crucial feature. Ensure that your HA solution can detect both node- and service-level problems.
7. Support for in-node and cross-node recovery
The ability to perform recovery actions both across cluster nodes and within a node is also important. In cross-node recovery, one node takes over the complete domain of responsibility for another. When systems-level heartbeats are missed, the server which should have sent the heartbeats is assumed to be out of operation, and other cluster members begin recovery operations. With in-node or local recovery, failed system services first attempt to be restored within the server on which they are running. This task is typically done by stopping and restarting the service and any dependent system resources. This recovery method is much faster and minimizes downtime.
8. Transparency to client connections of server-side recovery
Server-side recovery of an application or even of an entire node should be transparent to client-side users. Through the use of virtualized IP addresses or server names, the mapping of virtual compute resources onto physical cluster entities during recovery, and automatic updating of network routing tables, no changes to client systems are necessary for the systems to access recovered applications and data. Solutions that require manual client-side configuration changes to access recovered applications greatly increase recovery time and introduce the risk of additional errors due to required human interaction. Recovery should be automated on both the servers and clients.
9. Protection for planned and unplanned downtime
In addition to providing protection against unplanned service outages, the HA solution that you deploy should be usable as an administration tool to lessen downtime caused by maintenance activities. By providing a facility to allow on-demand movement of applications between cluster members, you can migrate applications and users onto a second server while performing maintenance on the first. This can eliminate the need for maintenance windows in which IT resources are unavailable to end users. Ensure that your HA solution provides a simple and secure method for performing manual (on-demand) movement of applications and needed resources among cluster nodes.
10. Off-the-shelf protection for common business functions
Every HA solution that you evaluate should include tested and supported agents or modules that are designed to monitor the health of specific system resources: file systems, IP addresses, databases, applications, and so on. These modules are often called recovery modules. By deploying vendor-supplied modules, you benefit from both the run-time that the vendor and other customers have already done. You also have the assurance of ongoing support and maintenance of these solution components.
11. Ability to easily incorporate protection for custom business applications
There will likely be applications, perhaps custom to your corporation, that you want to protect but for which there are no vendor-supplied recovery modules. It is important, therefore, that you have a method for easily incorporating your business application into your HA solution’s protection schema. You should be able to do this without modifying your application, and especially without having to embed any vendor-specific APIs. A software developer’s kit that provides examples and a step-by-step process for protecting your application should be available, along with vendor-supplied support services, to assist as needed.
12. Ease of cluster deployment and management
A common myth surrounding HA clusters is that they are costly and complex to deploy and administer. This is not necessarily true. Cluster administration interfaces should be wizard-driven to assist with initial cluster configuration, should include auto-discovery of new elements as they are added to the cluster, and should allow for at-a-glance status monitoring of the entire cluster. Also, any cluster metadata must be stored in an HA fashion, not on a single quorum disk within the cluster, where corruption or an outage could cause the entire cluster to fall apart.
By looking for the capabilities on this checklist, you can make the best decision for your particular HA needs.

